Assembly actually consists of two parts: attaching the neck to the body, and assembling the hardware and strings to the final finished instrument (and doing setup, but perhaps that deserves a page of its own).
Neck Assembly
Obviously, this step depends a fair bit on what type of neck joint is used, and there are several. Per wikipedia:
The neck joint or heel is the point at which the neck is either bolted or glued to the body of the guitar. Almost all acoustic steel-string guitars, with the primary exception of Taylors, have glued (otherwise known as set) necks, while electric guitars are constructed using both types. Most classical guitars have a neck and headblock carved from one piece of wood, known as a “Spanish heel”. Commonly used set neck joints include mortise and tenon joints (such as those used by C. F. Martin & Co.), dovetail joints (also used by C. F. Martin on the D-28 and similar models) and Spanish heel neck joints, which are named after the shoe they resemble and commonly found in classical guitars. All three types offer stability.
Bolt-on necks, though they are historically associated with cheaper instruments, do offer greater flexibility in the guitar’s set-up, and allow easier access for neck joint maintenance and repairs. Another type of neck, only available for solid-body electric guitars, is the neck-through-body construction. These are designed so that everything from the machine heads down to the bridge is located on the same piece of wood. The sides (also known as wings) of the guitar are then glued to this central piece. Some luthiers prefer this method of construction as they claim it allows better sustain of each note. Some instruments may not have a neck joint at all, having the neck and sides built as one piece and the body built around it.
wikipedia
So there are basically 3 types of neck joints (set, bolt-on, through), and several variations on the set necks and the bolt-on:
- Set necks (glued-in)
- Spanish Heel
- Mortise and Tenon
- Dovetail
- Bolt-attached necks
- Bolt-on
- Mortise and Tenon
- Direct heel attach
- Neck-through
- With wings
- Single-piece instrument
1 – Set Necks
Before I get into the details of them, I’d like to visit the question of why (as in “why would I want to use a set neck?”). Because while the benefits of a bolt-on neck are fairly obvious (ease of repair. esp. neck angle reset), the benefits of a set neck are not obvious.
The first benefit goes to tone, or at least purports to. Many luthiers feel that a set neck is a more ‘rigid’ connection between the neck and body, leading to better transfer of acoustic energy, and thereby better tone. Others think that is total hoo-haw, and that it would take a very well-trained (or, some might say well-bamboozled) ear to tell the difference. Some point to the extra mass in the form of metal in the joint as being a ‘tone-suck’, and there may be some truth to that, however look at the mass in a Spanish heel…
The second benefit is to enable the use of bodies with no access to the internal cavity. Archtop and f-style bodies, and any other body style that does not provide a hand-sized hole at the bottom of the fingerboard provide absolutely no way to gain access to the headblock in order to insert the bolts. Many electric guitars get around this with the ‘bolt-on’ type of joint but acoustic instruments don’t lend themselves well to it.
And so, if you want to make an archtop or f-hole instrument, the set neck is the only choice you have.
1.1 – Spanish heel
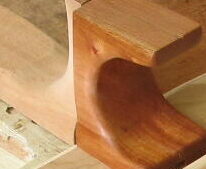
The Spanish heel is named for the shape of the heel, and is mainly associated with Spanish guitars with nylon strings.
We are given to believe that it was invented by Antonio Torres (“Antonio de Torres Jurado” [1817-1892], known as Torres, a guitar maker who achieved some local renown in his life but was never free from poverty. He was certainly instrumental in restoring the guitar’s viability at a time when it was manifestly failing to compete with louder, more dramatic instruments. He did this by advancing many features of what we know know as the ‘standard’ Spanish Guitar, including the use of the Spanish heel.
Other joints, such as a dovetail, require a neck block to be installed (typically glued) inside the guitar body, to which the neck is then attached. The Spanish heel is a one piece neck where the block is actually part of the neck. There are slots in the side of the neck into which the sides are glued. As a result, the guitar is essentially built around the neck joint.
One of the issues with this type of construction is that neck resets are basically impossible to do without removing the top or back. As a result, this type of joint is usually reserved for a ‘proper’ Spanish-style guitar with nylon strings and lower string tensions
The size and shape of the heel varies with the maker and can be an area of individual design and a way to show style and craftsmanship.
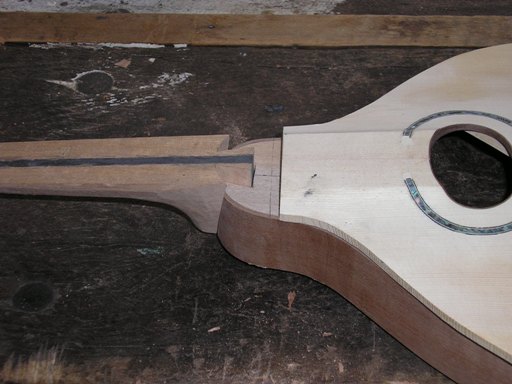
1.2 – Mortise and Tenon
This neck joint is basically a straight-sided mortise and tenon, with the mortise cut out of the headblock inside the body and the tenon cut into the heel block on the neck. An example is shown at the right.
Having created a joint between the neck and the body that establishes their relationship (side to side, up and down, and neck angles, both vertical and horizontal), there remains the question of how to fix them together. I know of two such methods that are currently in use: the ‘Cumpiano’ barrel-bolt method, (see next in the Bolt-on Necks section), and the glued joint, sometimes accompanied by a locking dowel method.
A splended example of the glued M&T, with the locking dowel method are demonstrated by Gary Nava of Nava Guitars. To get the full story on how this works, it is best to watch his YouTube videos (see this Post). In summary, he creates a rather large Tenon , with Mortise to match, fits them precisely to get a really tight fit, and then glues them together with (gasp!) epoxy. He then drills a hole vertically through the joint in four spots, and glues in some dowels (with more epoxy), which locks them together mechanically.
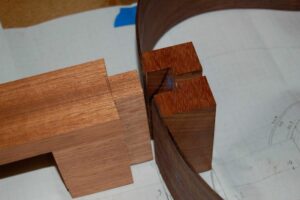
1.3 – Dovetail Joint
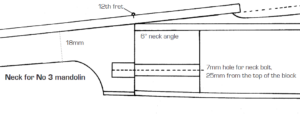
A good example (and, actually, the only one I have so far) of a dovetail joint is from Peter Coombs – see image to the right. This is similar to the dovetail joints used in cabinetry to create boxes for things such as drawers. On a stringed instrument, however, some adjustments are made to fit the application.
To begin, from the figure we see that stringed instruments have only one one dovetail, rather than the multiple ones in cabinetry. Secondly, it is a fair bit larger. Some other accommodation are made as well, some of which are not obvious from the photo.
- The angle of the dovetail wrt the fingerboard has to be set so that the fingerboard lines up with a predetermined height at the bridge. This is called the ‘Neck Angle’.
- If, as is the case with the Mandolin shown here, the shape of the connection to the body is curved, then the shoulders of the Tenon should match that.
- It is a good idea to shorten the tenon of the dovetail slightly, to ensure there will be a gap in the joint just in case the neck needs to be removed later in the life of the mandolin. Without this gap, the dovetail joint is almost impossible to loosen.
- A slight taper is cut into the dovetail joint in the headblock. This slight taper needs to be replicated in the Tenon. This is intended to fix the height at which the neck sits in the joint.
A lot of work with this type of joint is trimming, sanding, and adjusting it to ensure a tight and properly aligned fit. Most folks use something like HHG to affix it, so that neck resets can be accomplished later.
2 – Bolted Neck
2.1 – Bolt-on
This is the typical electric guitar joint epitomized in the Gibson Telecaster. The name is actually a bit of a misnomer, as it is usually done with screws (plus a metal plate), not actual bolts. While there are some implementations out there that are done with threaded inserts installed in the neck ‘heel’, most are simply screwed in through the metal plate.
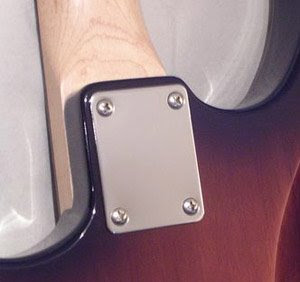
In the typical electric guitar bolt-on neck joint, the body and neck join in the horizontal plane – the bottom end of the neck is is formed as a flat tenon, inserted in a pre-routed “pocket” in the body. They are joined using 4 (rarely 6) screws. As screw heads damage the wood and could put extra stress on it, typically a rectangular metal plate or a pair of metal plates are used to secure the joint and re-distribute the screw pressure evenly.
Typically cited advantages of bolt-on neck include:
- Easier and cheaper to mass produce and repair if damaged. Necks that allow Fender “standard” 4-screw joint are frequently interchangeable provided they are intended for the same style of guitar (e.g. Stratocaster or Telecaster): for example, one can order custom neck (with personal profile or radius) and change one by just removing one neck and attaching the other. A Stratocaster neck can also be fitted to a Telecaster body, although the reverse is untrue unless some minor modifications are made. Less traditional versions exist, such as 3-screw plate (with easier micro-tilt adjustment) or even 6-screw plate bolt-on joint, but they may differ widely in the shapes, sizes and position of screws. Which one is better is debatable, but budget guitar manufacturers often choose 3-screw joints for its minimal cost, notwithstanding the quality.
- Easy to control: sometimes bolt-on neck includes some sort of adjustment screw that can control neck-to-body angle.
- More resonance due to wood-to-wood contact in high quality bolt-ons, no glue allows better coupling.
- Commonly cited as having a sharper attack and “snap”, slightly brighter tone, but this advantage is frequently debated
And the disadvantages of bolt-on neck include:
- Less sustain, due to the bridge and nut being on two different pieces of wood, but this disadvantage is subjective, frequently debated, and not supported by formal research.
- Bolt-on necks are less structurally sound than neck-thrus, making them easier to break (also easier to fix), and more susceptible to going out of tune.
- Sloppy construction or assembly of a bolt-on guitar exacerbates any of its inherent disadvantages
Luthiers and guitar players cite both advantages and disadvantages of bolt-on neck construction. Note that most of these views are highly subjective and relative. It is not easy to measure most of the claims objectively or even compare objective factors, as guitars differ considerably.
2.2 Mortise and Tenon
Cumpiano’s Barrel-Bolt Neck Joint Method
In his book, apparently Mr. Cumpiano described a pinned joint method, but readers had a lot of trouble with it. And in fact, he himself admits that it has some issues:
My guitar-making textbook was first published in 1985, and has gone into eight editions without a major revision. Well, its time. This is it: but instead of republishing an entire edition, I’m just posting the first major revision here. Over the years, I’ve received quite a bit of mail from amateur builders struggling with the pinned mortise and tenon neck-joint system detailed therein. Its major drawback: the pinholes in the neck tenon must be offset by a minute amount to snug the neck down and into the soundbox. So how much is “minute,” exactly?
I learned the system in the Gurian workshops during the early seventies. The system was reportedly adapted by Michael Gurian and Walter Lipton from post-and-beam barn construction. In this ancient joint, oak pins are hammered through holes in the mortise into holes holes drilled in the tenon, holes drilled slightly offset, thus drawing the two tightly and permanently together. On the barn, both mortise and tenon were massive, and the pin was knocked in with a hammer.
The joint’s guitar counterpart requires much greater finesse and precision. An offset of one to two sixty-fourths of an inch is correct: much more and the pin simply refuses to enter the tenon or, if it does, mayhem can ensue: the neck shaft can be drawn forcibly away from the fingerboard. This rarely happened at the Gurian shop: we all learned how to install it without problems. But, alas, hindsight has shown that it is not a good neck joint to learn to do from a book or expect to get it right the first time every time. I’ve become aware over the years that although some students seemed to handle its challenges pretty well, other people using were stymied by the precision required for it to work properly—if not the number of special gadgets, fixtures and implements that have to be fashioned to handle its assembly.
So what are the alternatives? The tapered dovetail joint? Heavens, no! If there was ever a joint designed in hell for beginners, that one is it! There is little to be said for the joint to recommend it to hand builders. For us, the tapered dovetail is unnecessarily complex, requires endless fussing to get it to fit properly and as well, to disassemble it for resetting. Unless you’re already expert.
So here we have a joint I like and can recommend–AND have come to use, exclusively, myself. I have put down my pinning pliers forever! For those purists who maintain that hardware- based joints are untested Johnny-come-latelies, allow me to refer you to Renaissance lutes which often had a large, single wood screw holding the necks on. They’ve been around at least as long as mortise and tenon joints, tapered or straight.
I’m very pleased with the barrel bolt: It works remarkably well: its strength is more than adequate to the requirements; it does not budge, even after only gently tightening it. It is SO easy to construct, assemble and disassemble.
Cumpiano – https://www.cumpiano.com/an-improved-neck-body-joint
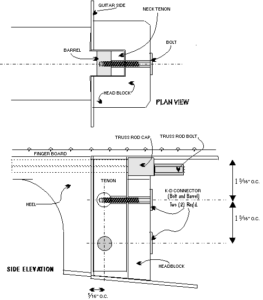
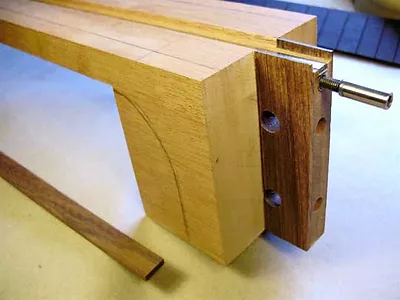
The article in the reference above gives his improved Mortise and Tenon joint, using a hardware-store fastener called, variously, a “barrel and bolt” , “KD (for knockdown) fastener,” or “connector bolt and dowel.” and is presented in the diagram to the right.
The drawing is fairly self explanatory. Drill the barrel and bolt holes in the neck blank on the drill press while it’s square BEFORE sawing the tenon and shaping the heel.
The hole in the tenon for the barrel should be located as close to the back surface of the heel (“the third line”) as possible, leaving as much tenon as possible remaining in front of the barrel for strength. Drill the barrel holes in the side of the blank (eventually, the side of the tenon) so the barrel fits tightly (I purchased a millimeter size drill to match mine perfectly). Drill the holes for the bolt over-size so the system will accommodate misalignment (in the headblock, 3/8″; in the end of the tenon, 5/16″) . You may have to hacksaw or grind the barrel’s length to the width of the tenon. Hacksaw a slot into the end of the barrel so that you can rotate it with a screwdriver while its in the tenon when you align the bolt to it. You must align the bolts to the barrel and insure that the threads are mating before attempting to actually bolt the neck to the body
When ready to attach the neck to the soundbox, apply glue under the fingerboard, throw a padded cam-clamp lightly from the fingerboard extension across the box to the back in order to snug the fingerboard down to the body (do several dry runs, of course to optimize fit and neck angle). THEN insert the bolts via the soundhole into the holes in the headblock and screw the neck into the body. Tighten the top bolt first, then the bottom. The remove the clamp, slip the fingerboard end caul and upper face-brace caul in place and clamp the fingerboard end down as described in the book text.
A long-handled 5/32″ hex Allen head wrench can be manipulated through the soundhole to tighten the bolt. Finger-tight is quite sufficient. Don’t bully it or crunch it down: not only is this unnecessary, but it may conceivably break the tenon. One more point: If you fear your customers might mistake the bolt heads for a truss rod adjusters and start to crank them down, warn them or inlay the bolt head and lightly tack a “cap” of matching wood over them to keep them from prying eyes.
The above process is the one used by Graham McDonald in his ‘Bouziki Book’. Mr. Cumpiano goes on to explain that several improvements on his method have been devised, and he describes one:
I discovered that my old partner Michael Millard of Froggy Bottom Guitars has been using his own version of this system, but has for good measure been reinforcing the tenon with two hardwood slats at either side, with their grain traveling at 90 degrees to the short grain of the tenon. This seemed like a splendid idea, that could update my technique easily. So here it is: new and improved.
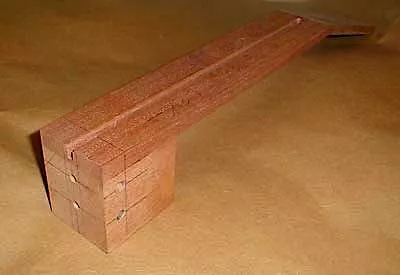
Here’s how I do it. I prepare two even grained hardwood slats, 3/32″ thick (old unmatched side blanks from my scrap bin are my source). When I make the two vertical table-saw cuts for the tenon, I plan for a total tenon width to remain that is 3/32″ narrower on either face than the finished, reinforced tenon. Now, my table saw blade naturally cuts a kerf that is .15″. That is ideal because the slots come out .04″ wider than the reinforcing slats. That allows minimal clearance so I can slide the slats in with medium-viscosity cyanoacrylate glue covering just the side that faces the tenon. I then proceed to drill the neckblock in the manner described above, and rout out the truss rod slot. When the time come to expose the tenon, I bandsaw “the third line”, stopping just as the blade kisses the hardwood slat on both sides. The neckblank appears as it does immediately below.
Cumpiano – https://www.cumpiano.com/an-improved-neck-body-joint
2.3 Direct heel attach
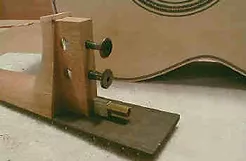
For Mandolins, I only know of one type – that described by Graham MacDonald. This uses insert nuts to provide an attachment point for bolts through the headblock. The neck is first fitted to ensure the correct neck angle, and alignment with the body. The headblock has a predrilled hole, close to the bottom and inline. Before the back is fitted and installed, and once the fitting is complete, the neck and body are clamped together in alignment, and the location for the insert is marked through the headblock, using a brad-point drill bit. Then the hole for the insert is drilled, as close to perpendicular with the neck end as possible. The insert is installed, with a bit of epoxy to help ensure the nut does not loosen up in the joint.
For Octave Mandos and Bouzokis, where the neck heel is a bit beefier, Graham uses the Cumpiano ‘improved’ Barrel-bolt MT neck joint.