

This project apparently started in 2011 (peering into the past, from 2016 perspective). I was active with the Fumblin’ Fingers, and was interested in more types of instruments, but didn’t have the wherewithal to outright purchase an Octave Mandolin (let alone the gumption to pass it by the Boss’s inspection). Having been to several guitar shows in Montreal, and reading several books on the subject, I convinced myself that I could do this. After reading whatever I could get my hands on at the local library, and then purchasing the ones I thought were best, I studied them all and came to the conclusion that the Graham MacDonald book (The Bouzouki Book: A Workshop Guide to Building Irish Bouzoukis and Citterns) was the right place to base my own build on. The instructions are clear, the design process just makes sense, the jigs and tools are accessible, and, what the heck, I like the spiral-binding format. I planned it all out, based on the instructions from Graham’s book, and bought a bunch of wood from a supplier at that year’s show. Buying some Mahogany for the back and sides, as well as the neck, and some Sitka spruce for the top, I embarked on my first lutherie adventure.
Having bought all that lovely tonewood, however, I realized that, being a rank beginner to the process, I would likely make every mistake (not) in the book. So I looked around and found some non-tone wood to practice on (OM 0.1 – engineering prototype), before starting out on the ‘real’ thing (OM 1). I found some scrap wood in my pile that looks very similar to Mahogany for the neck, and found some (properly quarter-sawn) Maple at KJP for backs and sides. It turns out that the maple is figured, and actually looks prettier than the mahogany. More on this later.
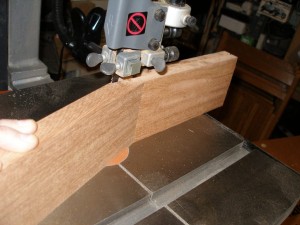
The first job I attempted was to build some necks and homemade truss bars. This would have been when I bought my bandsaw (my new favorite toy!). Following Graham’s advice, I decided to build with a bolt-on necks. The necks were cut out according to Graham’s instructions, and the headstock cut from the same wood and rejoined with a scarf joint. The extra thickness was then removed from the headstock.
The next job was the truss rods. Of course, the easiest way to obtain truss rods is to purchase them – Stew-Mac has them at reasonable cost, with different styles such as one-way (traditional for Mandolins), and two-way, as well as just plain carbon-fibre inserts, but the trick is finding ones to match the length of an OM neck. They now have a one-way truss rod that can be trimmed to length, but I wanted a two-way, so I decided to make them myself.
Again I fell back to Graham’s instructions for making these – 3/16″ steel rod is cut to length, and the bend point is heated with an torch and bent in a vice (“squashed” by the vice at the end). One end is longer, and that part is threaded by hand with a 10-32 die. The length is then covered with heat-shrink tubing. A short piece of 1/4″ square brass ‘rod’ is taken and a hole drilled at the end, and another hole is started (but not finished) right next to it. The brass is then cut to length, to make up a push block. I made up brass nuts (fashioned from brass stand-offs) to fit the threaded end, but in the end found some Fender ‘Bullet’ trussrod nuts (with allen key slots) at a good price.
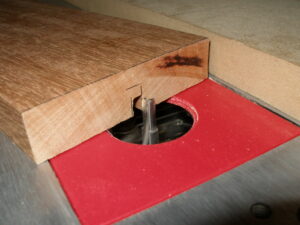
The next job was to cut the slots to fit the trussrods, which I did on my router table.
Sides
The sides needed to be thicknessed, and I don’t trust my skills with a handplane in that regard. It’s just as well, as it turns out that figured maple is a stone-cold pitch for that process – tear-out is endemic. The best way to do it, and compatible with my sensibilities, is to use a thickness sander. Again – no cash for these sorts of frivolities means DIY. It took me quite a long time to find all the parts necessary for it, but I built my own thickness sander.
I thicknessed the sides for #1 – with the figured maple. I then shaped them with my bending iron (in this case I finally broke down and bought the cheapest satisfactory one I could find n eBay…), and glued in the neck and tail blocks (a couple of refits on the neck block, as the clamps weren’t arranged properly the first time – reworked the joint with a heat gun, causing some scorching on one side).
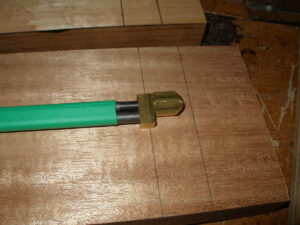
Next I bought some mahogany from KJP to make linings, sliced them on the bandsaw and ran them through the thickness sander to make them uniform, using dimensions from the Graham MacDonald book. (I was able to make them double-wide, and then sliced them lengthwise after to make 2x strips). I wanted to use the design used by Fox (see here), but decided that sourcing extra veneer and routing the inset was too much work. Instead, I used Kerf-side out on the bottom Kerf-side in on the top would give the extra stiffness needed by the top. I made a jig to do the kerfing on the handsaw. I found that Kerf-side out was a bit too fragile, and kept breaking the linings as they were being glued in, so I bent the last one on my bending iron, and that worked well.
Next steps:
- Finish making the sides;
- Trim the top and back of the sides with radius dishes.
- Make the top;
- Joint and join the top halves (done),
- Thickness to 2.5 mm.
- Add a Rosette and purfling,
- Make braces, install and tune,
- Glue on to sides.